03. How To | Random Tricks & Tips
Program Used: Photoshop CC
Tutorial Source: www.madevibrant.com
Level: Beginner-Intermediate

• Use "Step + Repeat" to create patterns and shapes.
Step 01: Create your shape or object that you want to make a pattern of.
Step 02: Make initial rotation of your object by pressing Ctrl + T and transforming it slightly [ keep in mind that this will be the transformation that repeats ]
Step 03: Hit Enter to apply.
Step 04: Press Ctrl + Shift + Alt + T repeatedly to repeat your transformation and create your pattern.

• Use 'Select >> Color Range' to remove any solid background.
Step 01: In the menu bar, choose Select >> Color Range.
Step 02: In the options pop-up, make sure that the Select dropdown is on Sampled Colors and the eyedropper tool is selected.
Step 03: Click the eyedropper in your document area on the color you wish to remove.
Step 04: Adjust the Fuzziness spectrum based on the level of contrast in your document and how detailed you'd like your selected to be. The higher the number, the more detailed/ expanded your selection would be.
Step 05: Click OK.
Step 06: Now you're free to hit delete to remove your selection.

• Make Duplicates by using "Alt + Drag".
Hold down Alt and click and drag the layer in your image to create instant duplication. You can duplicate shapes, layers, images, layer styles etc.

• Use " [ " and " ] " to change your brush tip size.
To adjust the size of your brush, just click on the left or right brackets.

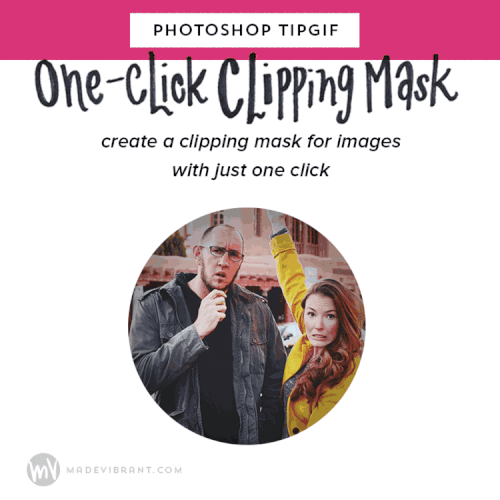
• Create a clipping mask by "Alt + Clicking" between the two layers.
• Quickly subtract or combine shapes.

• Hide all but one layer or a group.
You can Alt + Click the eye icon to hide all the layers except that one. To reverse it, simply Alt + Click the layer again.

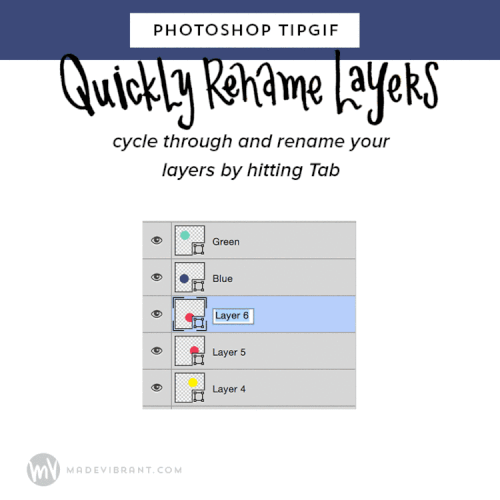
• Use "Tab" to rename your layers.
Step 01: Double click on a layer to rename it.
Step 02: Instead to pressing Enter, press Tab.
Step 03: This will automatically allow you to rename the next layer.
• Change color of your canvas background.
Step 01: Make the desired color your foreground color.
Step 02: Click on the Paint Bucket tool.
Step 03: Hold down Shift and click outside the document area.
Step 04: To undo the action, right click outside the document area and select one of the default grey options.

That's it! Hope you like this tutorial. Link to the original source: https://www.madevibrant.com/blog/photoshop-tips

Bạn đang đọc truyện trên: Truyen2U.Com